AI Maestro

AI Maestro

Visual machine learning

Build a machine learning pipeline by wiring nodes on a canvas. Press Run and a real Python engine trains it, evaluates it, and saves the whole thing as an experiment you can reproduce.

  • AIMaestro-Setup.exe trains on the CPU
  • AIMaestro-Setup-CUDA.exe uses an NVIDIA GPU
  • Windows 10 & 11, 64-bit

Note The installer is not code-signed yet. Windows SmartScreen may warn you: choose More info, then Run anyway.

01 CAPABILITIES

Everything a run needs, on one canvas

Seven things the app does between a file on disk and a result you can defend.

  • F.01

    The canvas that checks itself

    Nodes carry data, preprocessing, representation, split, and model. A wire is only allowed if the pipeline would actually run, and a refused wire names the rule it broke and what to insert instead.

  • F.02

    A real Python engine

    Press Run and a real Python engine trains and evaluates the workflow you drew. Nothing on the canvas is simulated.

  • F.03

    Live telemetry

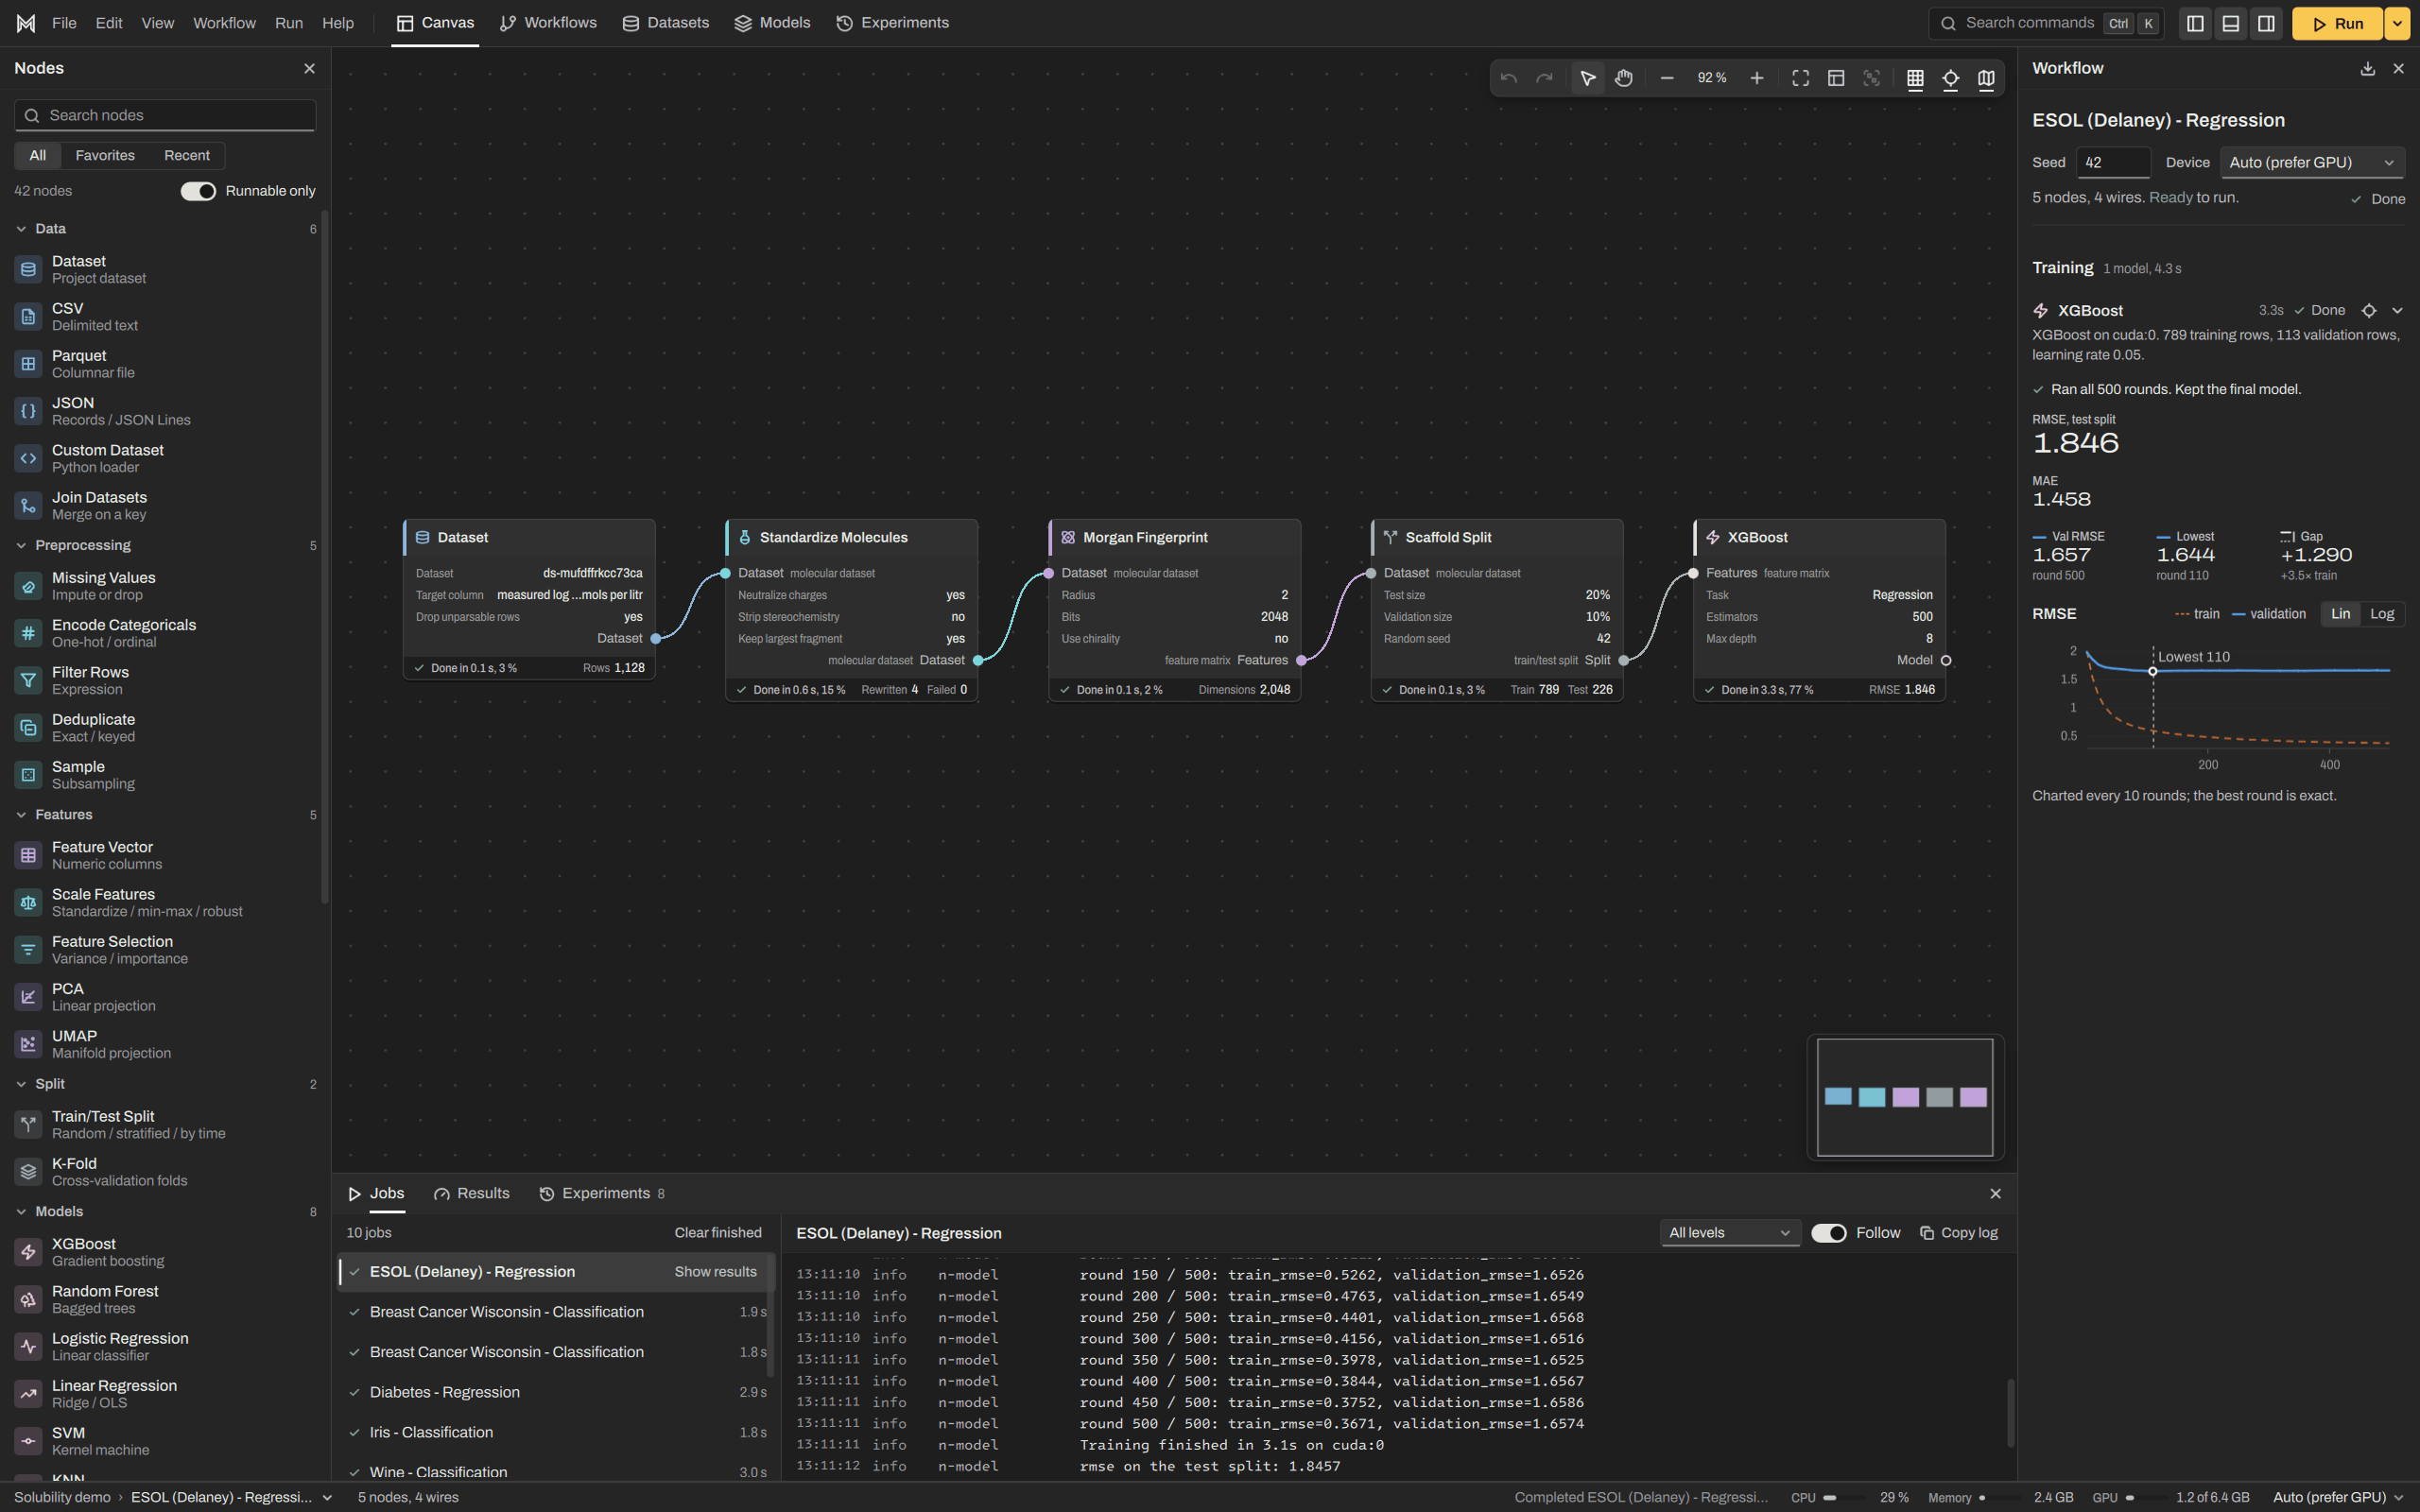
    Training curves draw themselves while the run is in flight, alongside live CPU and GPU usage. You watch the fit converge instead of reading a log afterward.

  • F.04

    Results that fit the task

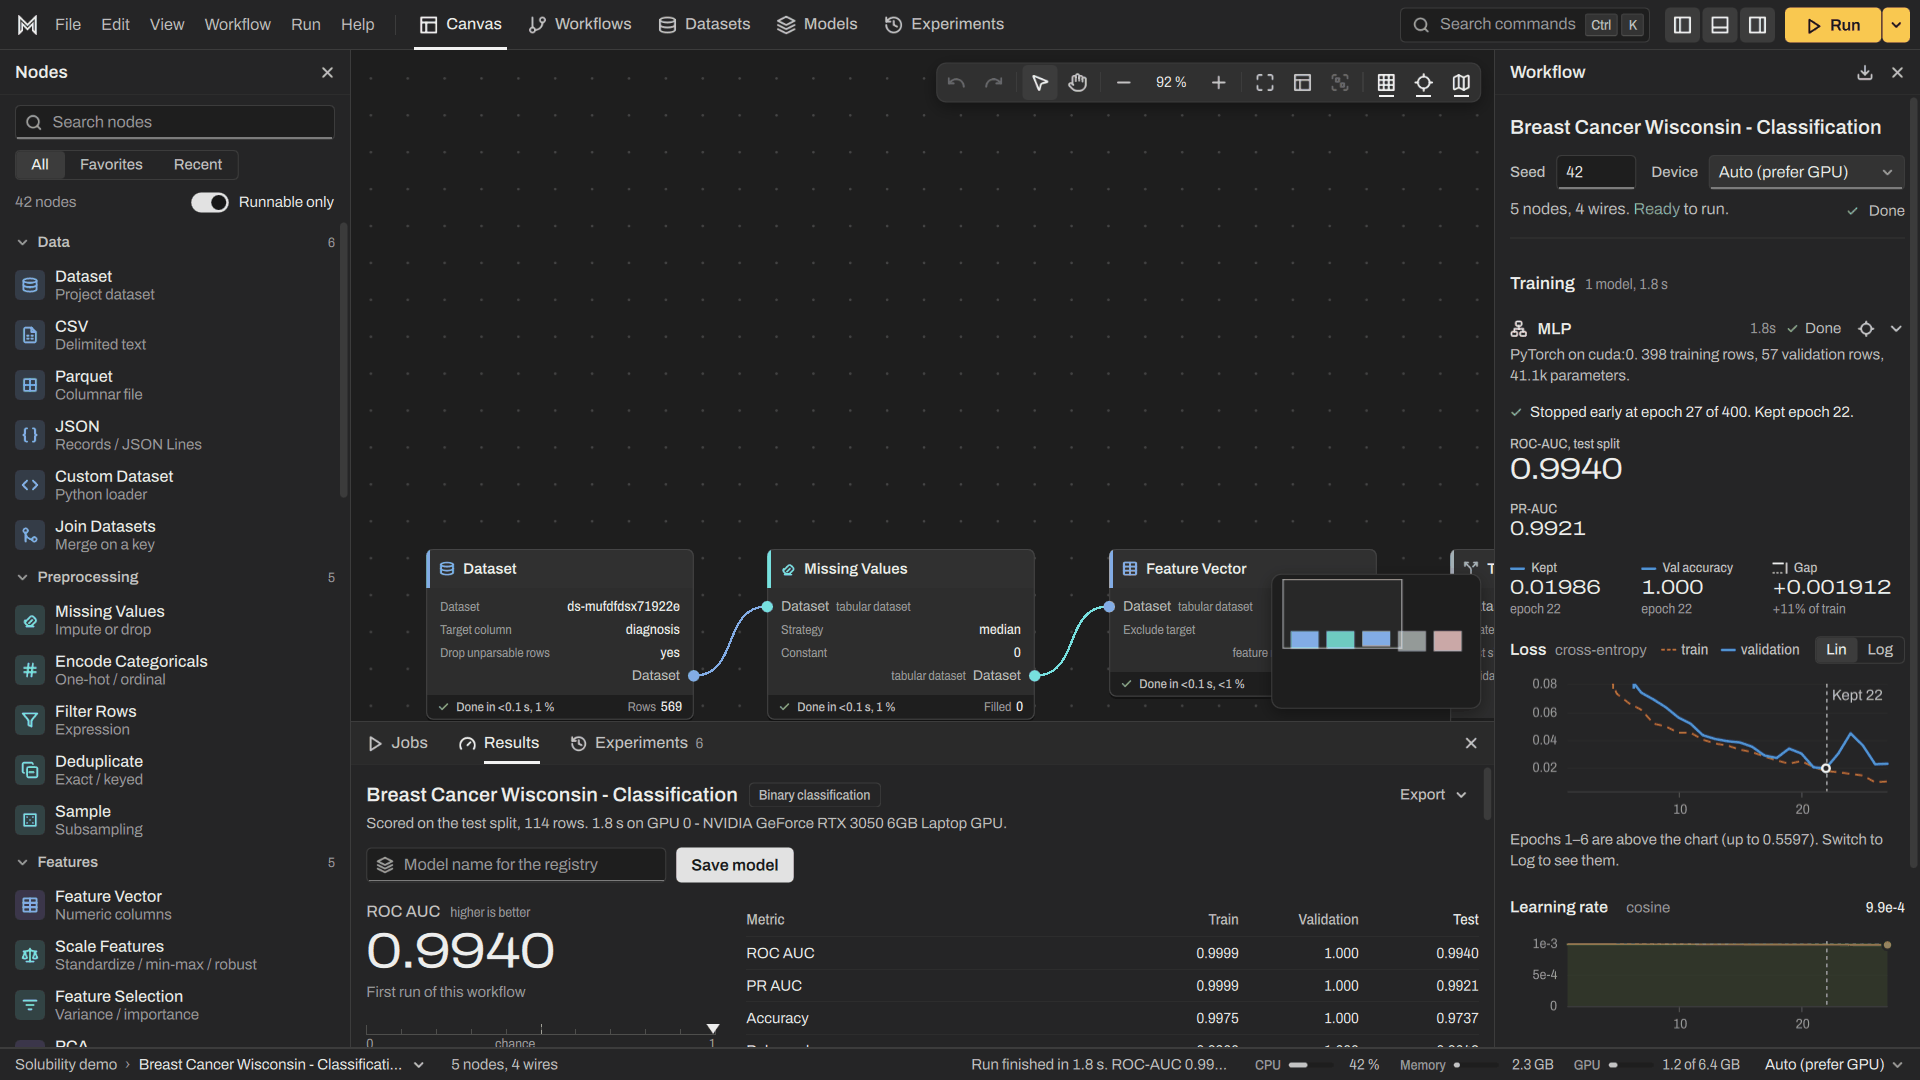
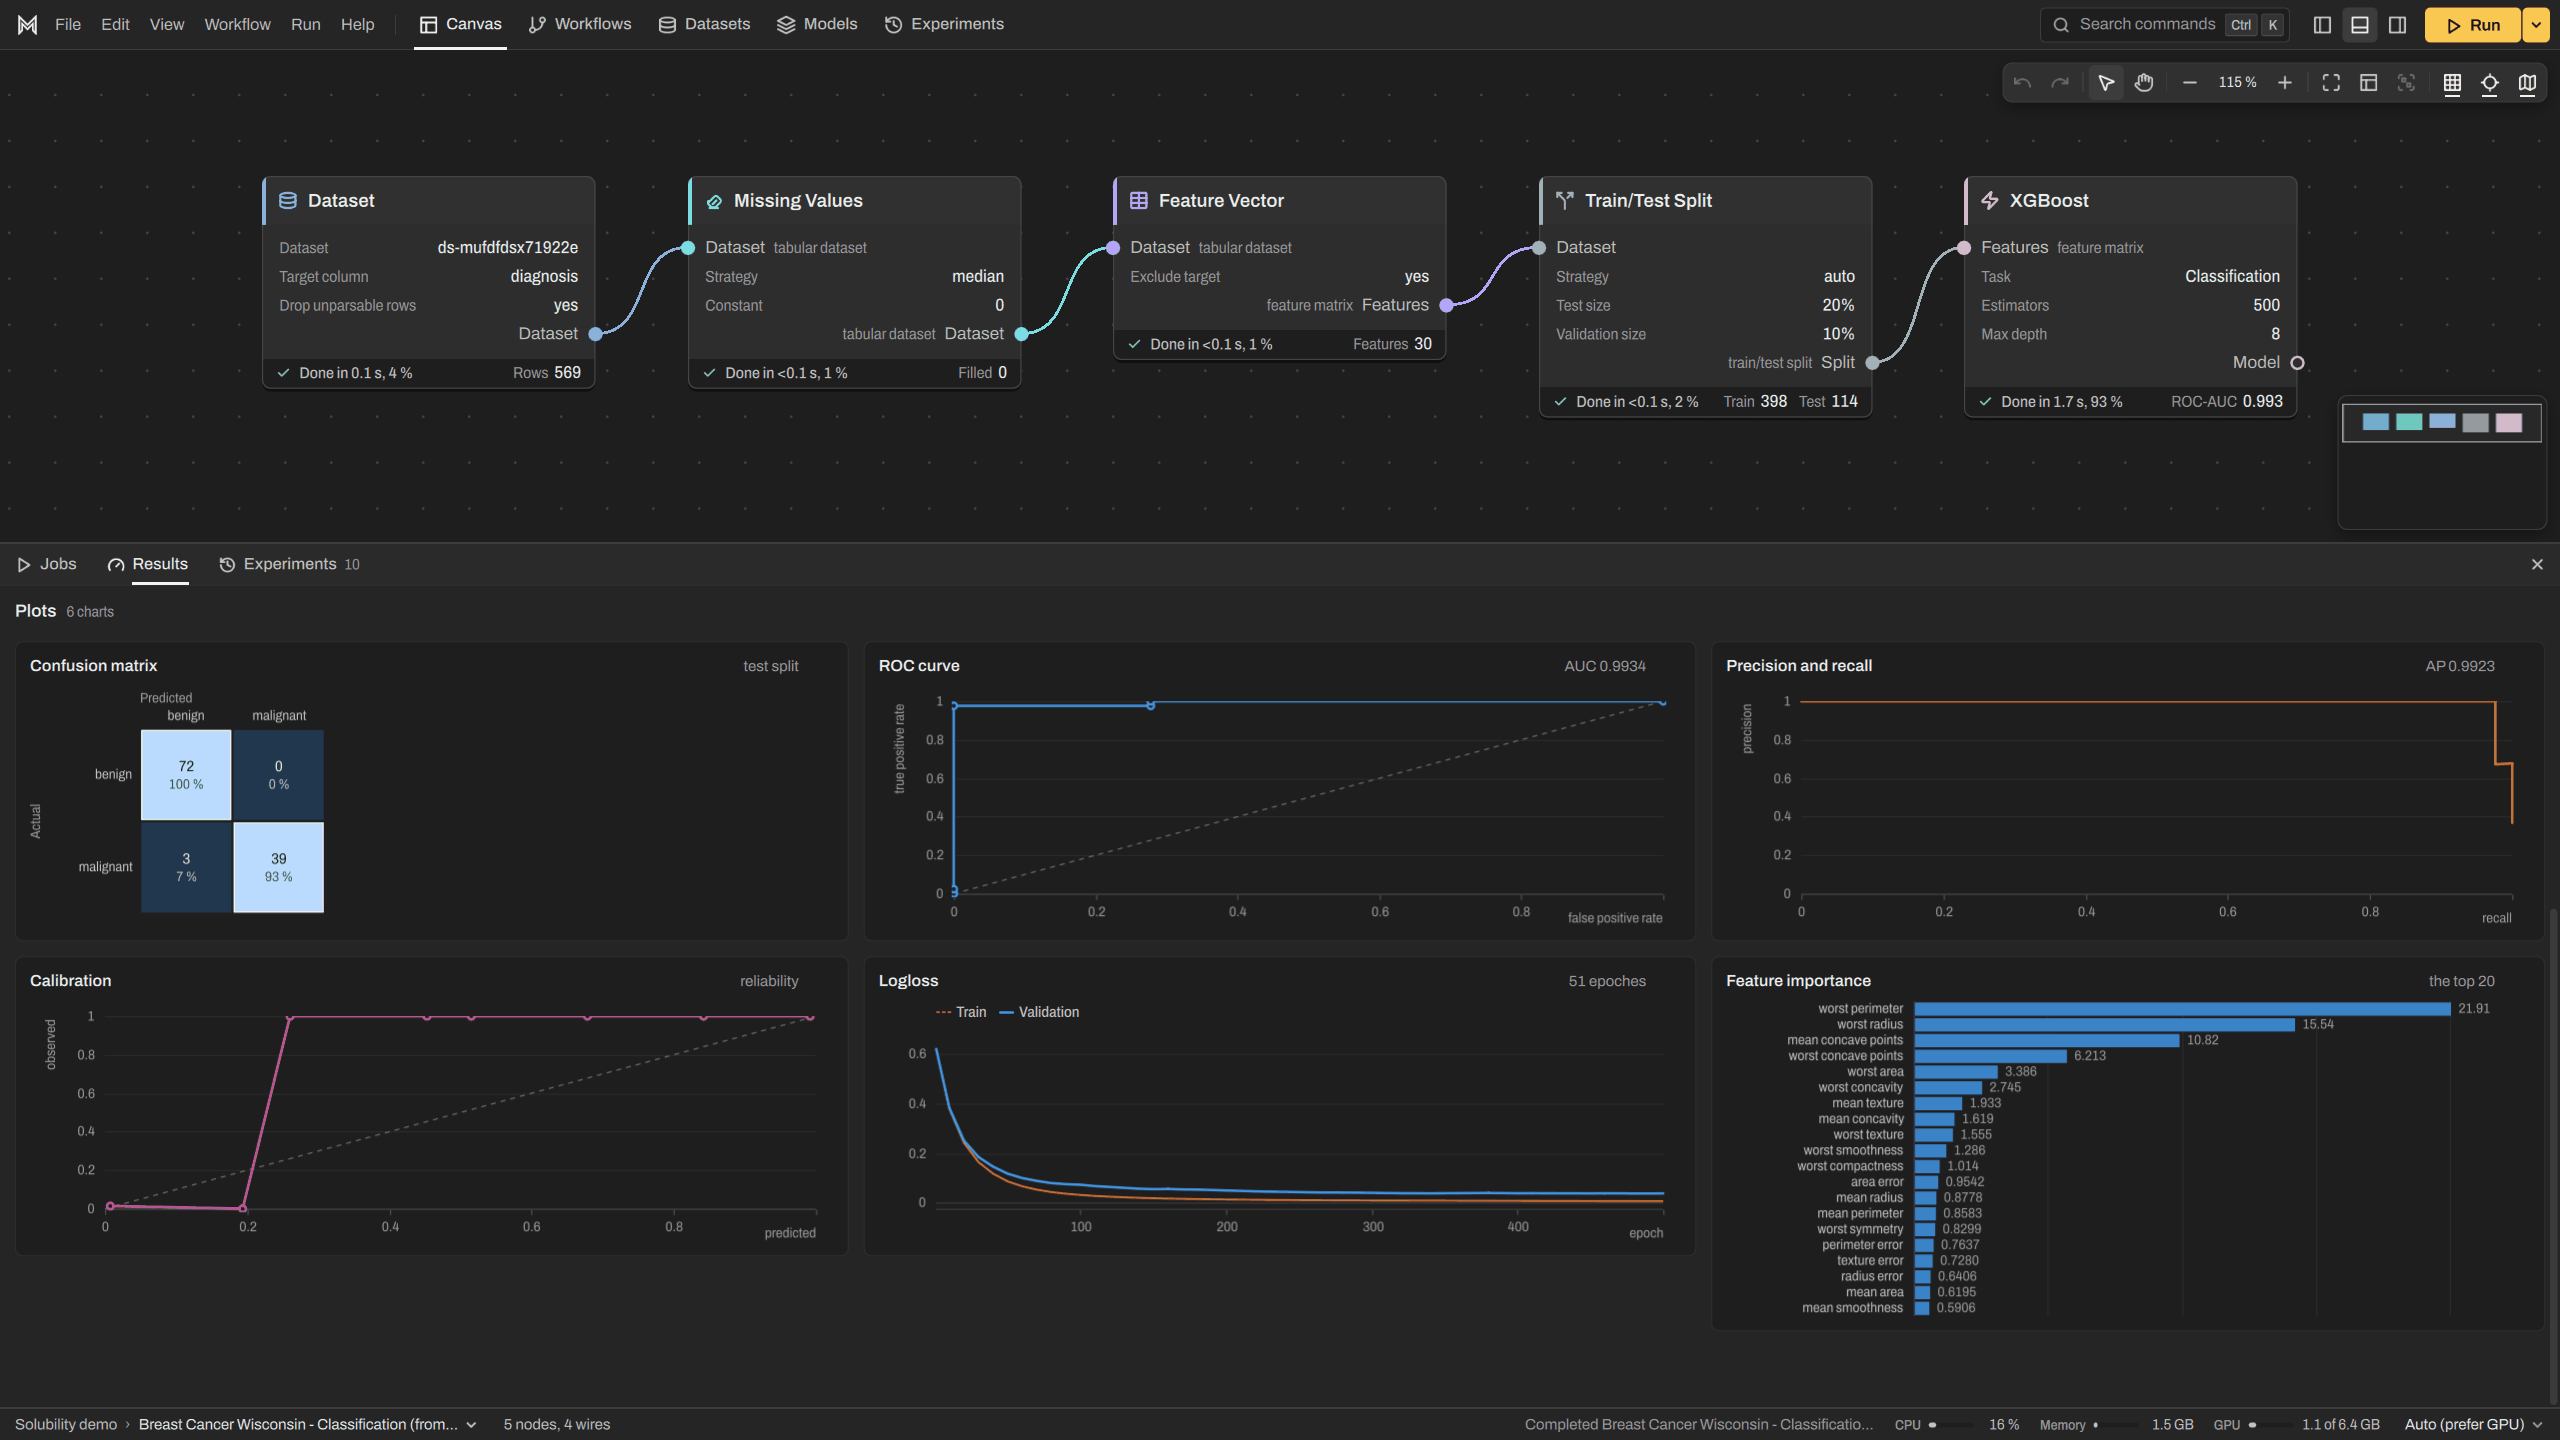
    Classification returns a confusion matrix with ROC and PR curves. Regression returns parity plots. Feature importance appears wherever the model reports it.

  • F.05

    Every run is an experiment

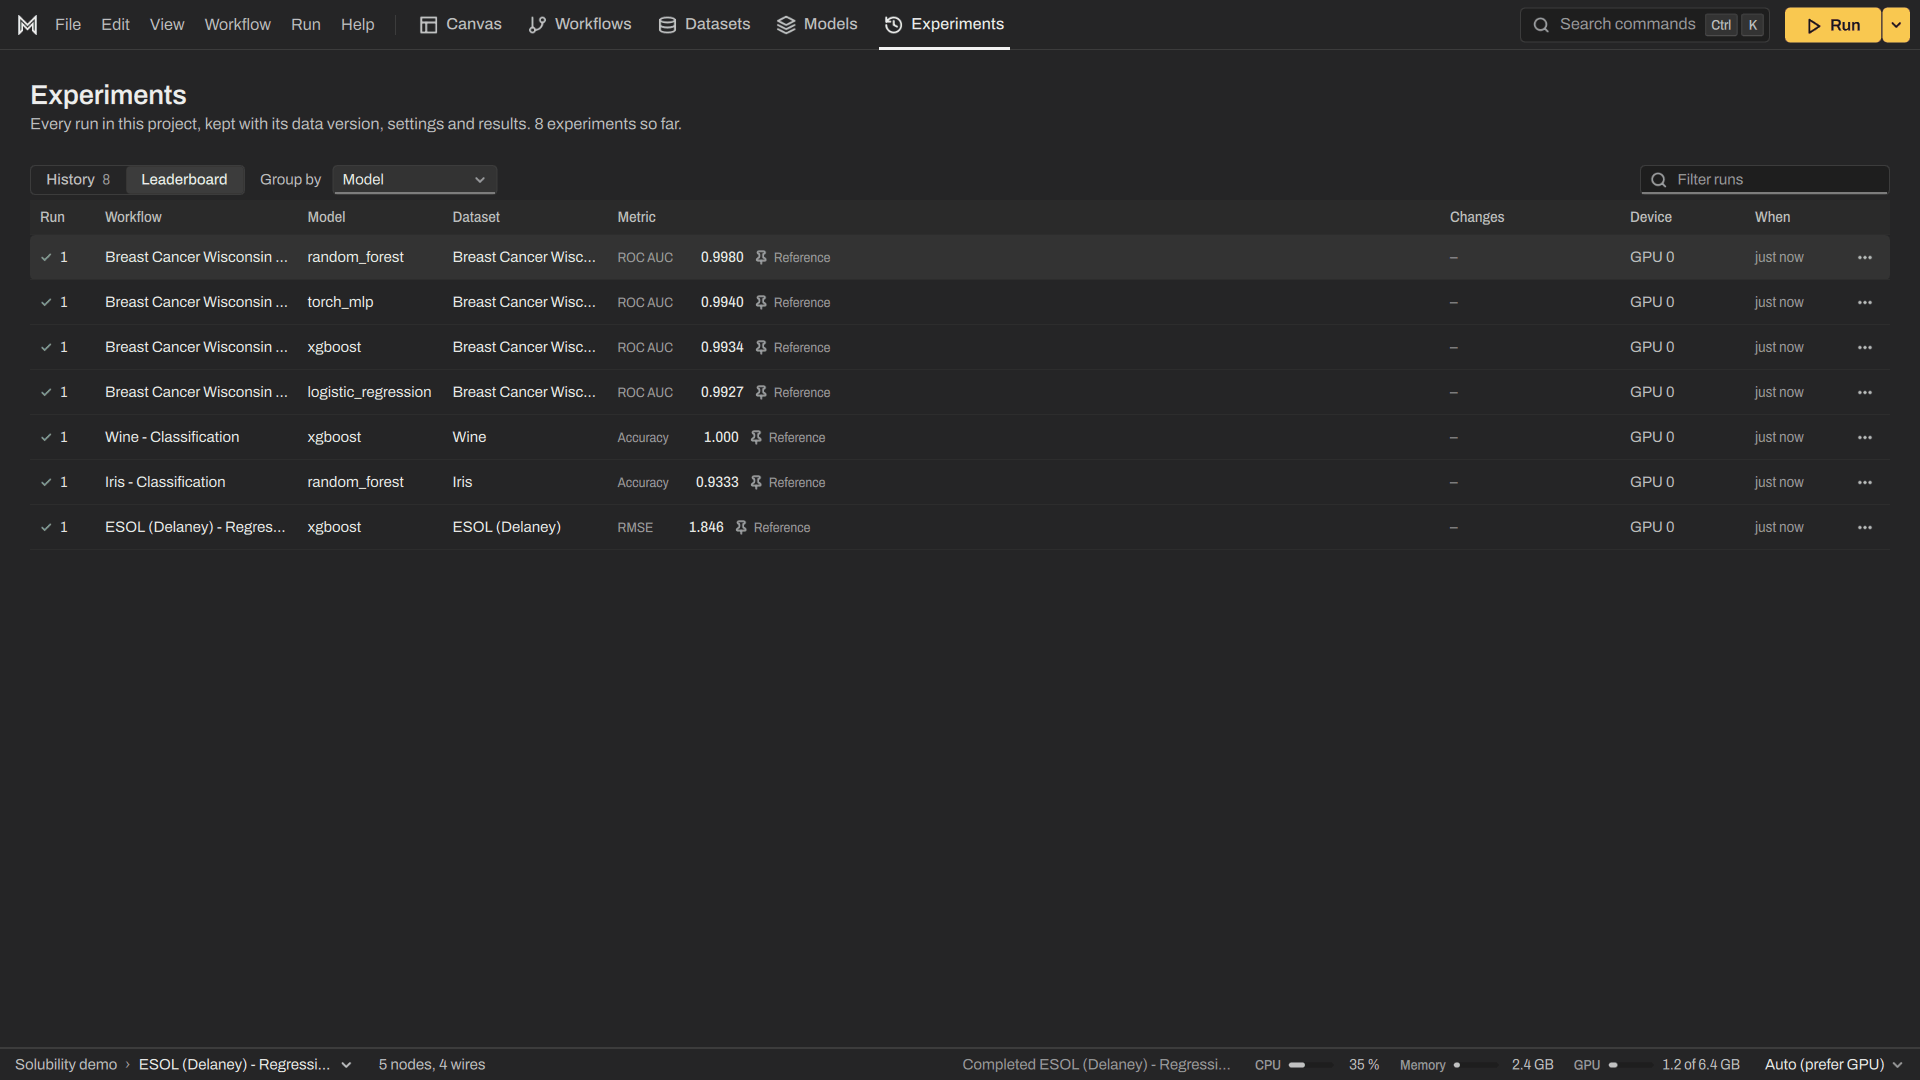
    Each run is saved as a reproducible experiment, settings included. Runs collect on a leaderboard where they are compared side by side.

  • F.06

    Molecules, properly

    The chemistry plugin adds RDKit, SMILES structure drawing, and scaffold splits. Graph neural networks read a molecule as a graph of atoms and bonds rather than a row of numbers.

  • F.07

    Extensible

    Plugins add nodes and capabilities to the canvas. The chemistry set is one of them, so what a pipeline can hold is not fixed at install.


AI Maestro results panel showing a confusion matrix, ROC curve and feature importance for a finished run.

SCREENSHOT · RESULTS

assets/screenshots/results.png · 2560×1440

FIG. 01 · RESULTS PANELAM-01

02 Model library

Models in, data in

Nine model types ship with the app, and they train on plain tables, the built-in datasets, or molecules.

Model index

Model Task
XGBoost
Both
LightGBM
Both
Random forest
Both
SVM
Both
KNN
Both
Linear regression
Regression
Logistic regression
Classification
PyTorch MLP
Both
Graph neural networkmolecules
Both

09 entries

Data in

File formats

  • CSV
  • Parquet
  • JSON
  • Excel

Built-in datasets

  • Iris
  • Titanic
  • California Housing
  • ESOLsolubility
  • Tox21toxicity

Chemistry

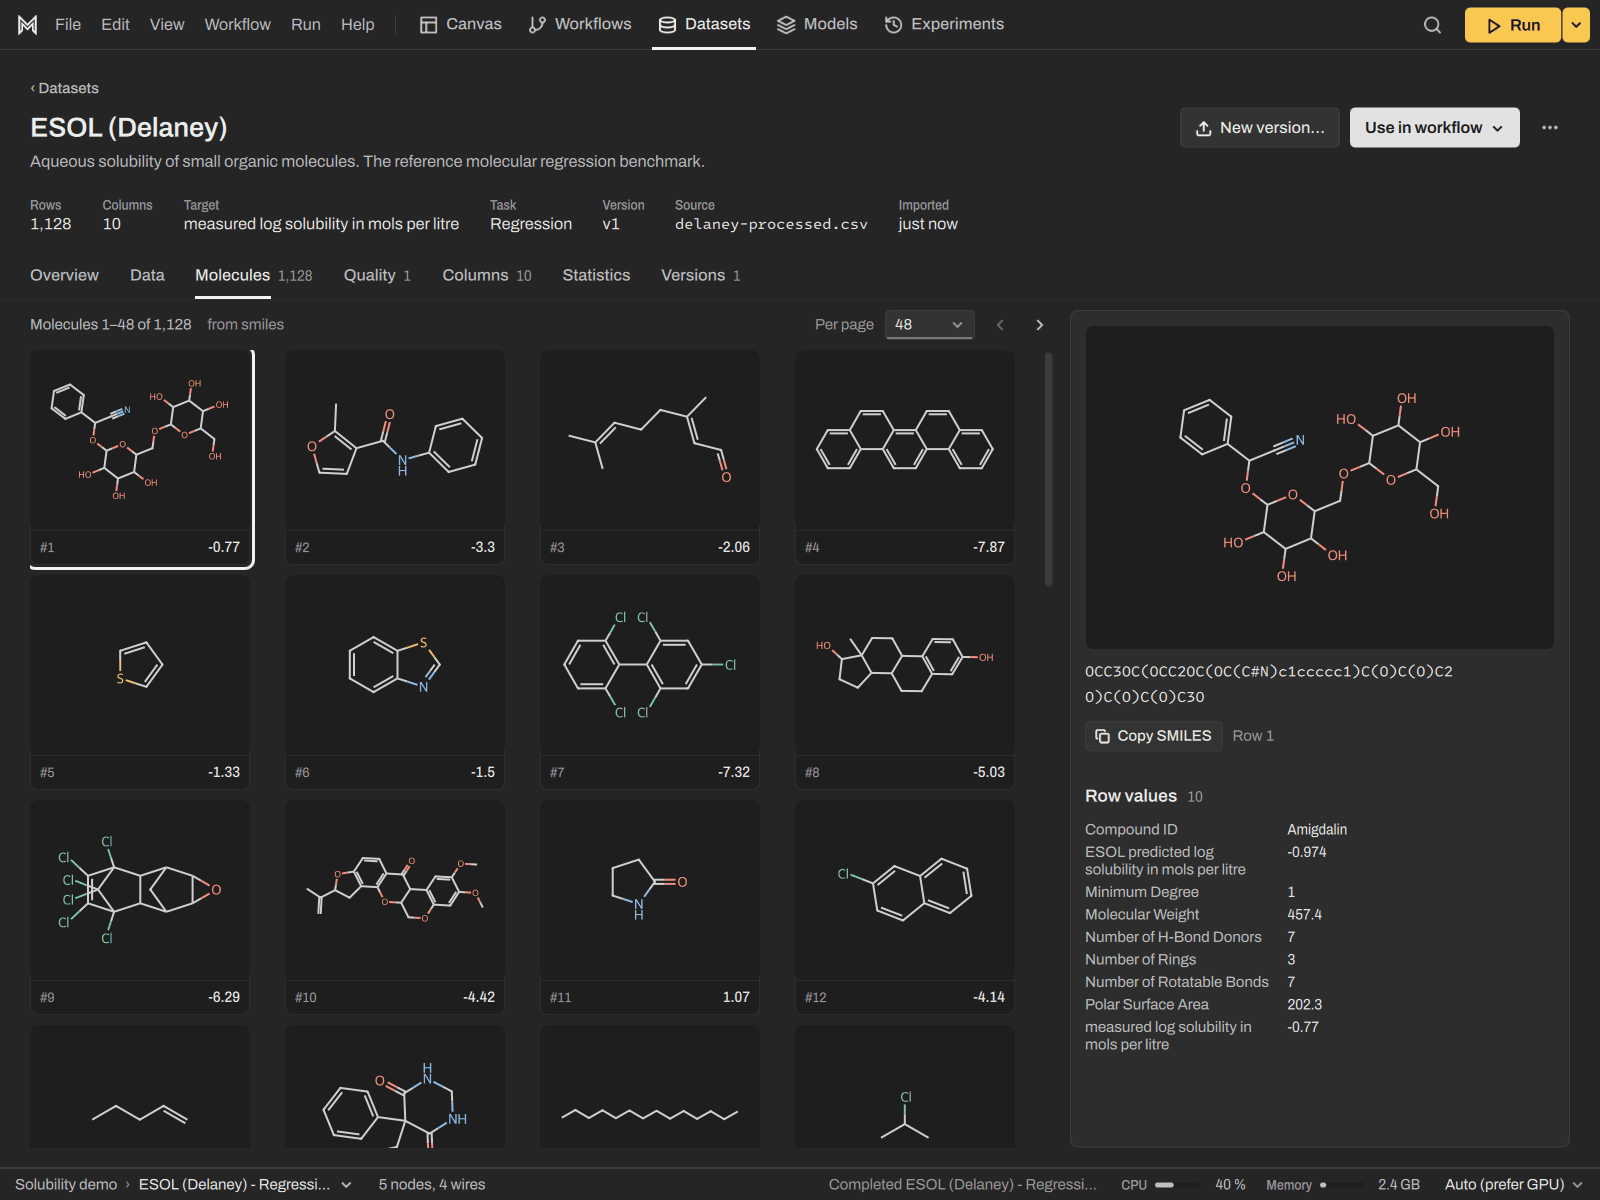
The chemistry plugin adds RDKit. Give it a SMILES string and the structure is drawn beside the table it came from.

Splits can be taken by scaffold, so a framework does not sit on both sides of the line. Graph neural networks read the molecule as a graph of atoms and bonds instead of a row of numbers.

A molecule drawn from its SMILES string next to the dataset table in AI Maestro.

SCREENSHOT · MOLECULE

assets/screenshots/molecule.png · 1600×1200

FIG. 02 · Molecule viewAM-01

03 THE CANVAS

Wires that only connect if they run

You build a run by wiring nodes on a canvas, left to right, until the pipeline is complete. A wire that could not execute is refused as you draw it, and the canvas says which rule stopped it.

PIPELINE SCHEMATIC
Schematic of an AI Maestro pipeline: five stages wired into a results readout Six blocks stand in a row and are wired left to right: data holding titanic.csv, preprocessing doing impute and scale, representation producing descriptors, split at eighty twenty random, and a model running xgboost, ending in a results readout. Below the row a dotted wire leaves the data block, runs across, and stops at a crossed box under the model input: a connection the canvas refused, because a model cannot read raw data. DATA TO RESULTS 01 DATA titanic.csv 02 PREPROCESSING impute + scale 03 REPRESENTATION descriptors 04 SPLIT 80/20 random 05 MODEL xgboost RESULTS auc 0.87 REFUSED · DATA TO MODEL DWG. 01 · PIPELINE SCHEMATIC SCHEMATIC · NOT TO SCALE

REFUSALS

A wire is checked before it lands

Drag a wire the pipeline could not execute and the canvas keeps it from connecting. The inspector names the two nodes, states the rule that blocked them, and says what belongs in between.

The rule is written in plain words, so the next attempt is an informed one rather than a guess.

CONNECTION REFUSED 01 / 03
  • Attempted
    DATA to MODEL
    Why
    A model cannot read raw data.
    Fix
    Insert preprocessing, representation and split between them.
  • Attempted
    MODEL to SPLIT
    Why
    Split has to happen before the model sees anything, or the evaluation leaks training data into the test set.
    Fix
    Reverse the wire. Split feeds the model, never the other way round.
  • Attempted
    REPRESENTATION to REPRESENTATION
    Why
    A representation node expects preprocessed columns, not another representation.
    Fix
    Wire this node back to preprocessing.
EXAMPLE

Every refusal names the rule and the node that would fix it.

FIG CANVAS AND LIVE RUN

The AI Maestro canvas with data, preprocessing, representation, split and model nodes wired into a pipeline.

SCREENSHOT · CANVAS

assets/screenshots/canvas.png · 2560×1600

FIG. 03 · THE CANVASAM-01
A run in progress showing the training curve and CPU and GPU usage.

SCREENSHOT · LIVE RUN

assets/screenshots/training.png · 1920×1080

FIG. 04 · LIVE RUNAM-01

04 Operation

Three steps from data to result

Every project runs the same short loop: wire the pipeline, run it, then compare what came back.

  1. Build

    Drag nodes onto the canvas and wire them: data, preprocessing, representation, split, model. The canvas refuses any wire that would not run, and tells you why.

    Nodes / Wires / Validation

  2. Run

    Press Run. A real Python engine trains and evaluates the pipeline while training curves and CPU/GPU usage update live.

    Python engine / Live telemetry

  3. Compare

    Each run is filed as a reproducible experiment. Compare them on the leaderboard, and take any workflow out as a Python script or Jupyter notebook.

    Experiments / Leaderboard / Export

05 Portability

Nothing is locked in

Runs stay reproducible inside the app, and every workflow leaves it as plain code that runs on its own.

Experiments and leaderboard

Every run is saved as a reproducible experiment: the workflow, the data configuration and the results travel together, so a number can always be traced back to the pipeline that produced it. Runs are collected on a leaderboard and compared side by side.

Illustrative leaderboard: five runs compared by metric. The best run is marked with a plus sign. The figures are examples, not measured results.
Run Model Split Metric
RUN-011 KNN 80-20 0.804
RUN-012 SVM 80-20 0.837
RUN-013 LightGBM 70-30 0.874
Best run. RUN-014 XGBoost 80-20 0.891
RUN-015 Random forest 80-20 0.866

+ marks the best run · figures are illustrative

The AI Maestro leaderboard comparing several runs of the same workflow.

SCREENSHOT · LEADERBOARD

assets/screenshots/leaderboard.png · 1920×1080

FIG. 05 · LEADERBOARDAM-01

Export to plain code

Any workflow exports to a plain Python script or a Jupyter notebook. The file is ordinary pandas, scikit-learn and XGBoost, and it runs on its own, without AI Maestro installed.

workflow_export.py workflow_export.ipynb
# Exported from AI Maestro 0.1.0 - workflow: titanic-xgb
import pandas as pd
from sklearn.model_selection import train_test_split
from sklearn.metrics import accuracy_score
from xgboost import XGBClassifier

# data
df = pd.read_csv("data/titanic.csv")
y = df["survived"]
X = df.drop(columns=["survived"])
X = pd.get_dummies(X, drop_first=True)
X = X.fillna(X.median())

# split
X_train, X_test, y_train, y_test = train_test_split(
    X, y, test_size=0.2, random_state=42, stratify=y)

# model
model = XGBClassifier(
    n_estimators=300, max_depth=4, learning_rate=0.08
)
model.fit(X_train, y_train)

# evaluate
preds = model.predict(X_test)
acc = accuracy_score(y_test, preds)
print("accuracy:", round(acc, 3))

Export includes the pipeline, the parameters and the split.
06 SPECIFICATION

System requirements

Everything AI Maestro needs to run on a Windows desktop.

AM-01 · Requirements Sheet 06
Operating system
Windows 10 (64-bit) or Windows 11
Architecture
x86-64
Processor
Any modern multi-core CPU
Memory
8 GB minimum / 16 GB recommended estimate
Disk space
1.3 GB for the standard build, 5.0 GB for the CUDA build
GPU
Optional – the CUDA build trains the PyTorch MLP and the graph neural networks on an NVIDIA GPU (driver 570 or newer); the standard build trains them on the CPU
Python
Not required – AI Maestro ships with its own engine
Installer
AIMaestro-Setup.exe · AIMaestro-Setup-CUDA.exe
Version
0.1.0
Code signing
Not signed yet – see the note below

Note

AIMaestro-Setup.exe is not code-signed yet, so Windows SmartScreen may show a blue “Windows protected your PC” dialog the first time you run it. Click More info, then Run anyway.

Code signing is planned.

Get the installer

07 QUERIES

Questions

What the installer warns about, what runs where, and what the app can read.


Entries10

Why does Windows warn me about the installer?

The installer is not code-signed yet, so Windows SmartScreen may show “Windows protected your PC” the first time you run it. Choose More info, then Run anyway. Signing is planned.

Do I need to know Python?

No. You build the pipeline by wiring nodes on the canvas. If you want the code, export the workflow as a plain Python script or a Jupyter notebook.

Do I need Python installed?

No. The app ships with its own Python engine, and Run uses it. You do not need a separate Python installation.

Where does my data go?

AI Maestro is a desktop application. It reads the files you point it at and runs the training on your machine.

What can I import?

CSV, Parquet, JSON and Excel files. Five datasets are built in: Iris, Titanic, California Housing, ESOL and Tox21.

Which models are included?

XGBoost, LightGBM, random forest, SVM, KNN, linear and logistic regression, a PyTorch MLP, and graph neural networks for molecules. Each one is a node you drop on the canvas.

Can it use my GPU?

Yes, with the CUDA build: it ships a CUDA PyTorch and trains the MLP and the graph neural networks on an NVIDIA GPU (driver 570 or newer). The standard build ships the CPU PyTorch and trains the same models on the CPU. Both show CPU and GPU usage live during a run.

Why did the canvas refuse my wire?

Because the resulting pipeline would not run. The canvas names the rule and the node that would fix it. Most often that is a missing Split before the model.

Is there a macOS or Linux build?

No. This 0.1.0 build is for Windows 10 and 11, 64-bit, and the download on this page is that installer.

Can I add my own nodes?

Yes, through plugins. The chemistry plugin is built that way: RDKit, SMILES structure drawing and scaffold splits.

08 ACQUISITION

Download AI Maestro

Two installers for 64-bit Windows 10 and 11, version 0.1.0. The standard build trains on the CPU; the CUDA build uses an NVIDIA GPU for the PyTorch MLP and the graph neural networks. Everything else is identical, and both carry every runtime the node library needs.

Download AIMaestro-Setup.exe standard · v0.1.0 Download AIMaestro-Setup-CUDA.exe CUDA · v0.1.0
Standard
AIMaestro-Setup.exe
Trains on
CPU
Download
370 MB
Installed
1.3 GB
CUDA
AIMaestro-Setup-CUDA.exe
Trains on
NVIDIA GPU
Download
2.0 GB
Installed
5.0 GB

Install sequence

  1. 01

    Download

    Save AIMaestro-Setup.exe, or AIMaestro-Setup-CUDA.exe for an NVIDIA GPU, and open it.

  2. 02

    SmartScreen

    Windows may show “Windows protected your PC”. Click More info.

  3. 03

    Run anyway

    Choose Run anyway and the installer continues.


AIMaestro-Setup.exe is not code-signed yet, which is why Windows raises the prompt above. Code signing is planned.